How to Customize and Optimize Your Windows 11 Experience

If you talk about “Windows 11” to someone who knows a lot about technology, they might not be interested. Many people don’t like it because it’s not much better than the previous version, Windows 10. Also, the new look might not be appealing to people who love Windows. However, you can change some things to make it easier to use. We will help you with that. Plus, there are some new features that you might find cool.
Get back your right-click options
Microsoft made a change to Windows 11 that many people find very annoying. They changed the way right-click menus look. Before, there were many options you could see right away, but now there are only a few. This makes the menu look smaller. However, you can still see all the options if you click “Show More Options.” This means you have to click an extra button to see everything.

Sometimes we have to use a right-click menu that we don’t like, which can be very frustrating. However, there is a way to make the old menu come back all the time. You need to add something to your computer’s settings, called the registry, using a special tool called the command line. Here are the steps to get the old right-click menus back:
Change Your Quick Settings the Way You Like Them
When you look at the bottom of your computer screen in Windows 11, you will see a small icon that looks like a gear next to the speaker icon. If you click on it, a menu will appear. This menu gives you quick access to some things you might use often, like turning on airplane mode or changing your Wi-Fi network. It’s like a control panel on your phone that helps you get things done quickly. You can even cast your screen to another device using this menu.
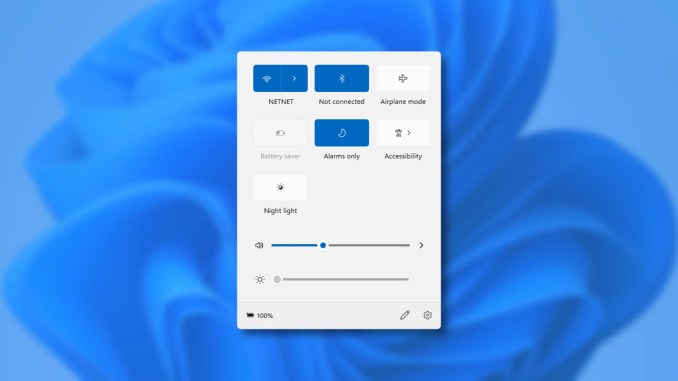
Some of the options in the quick settings menu are more useful for people who use mobile devices than those who use desktop computers. However, you can make changes to the menu to suit your needs. You can remove options you don’t need or add new ones that you want to see. To do this, click on the gear icon and then the pencil icon. This will allow you to customize the menu to your liking.
- Right-click the Start button and choose Windows Terminal.
- Copy and paste the code shown above into the Terminal window.
- Close the Terminal.
- To see the changes, restart your computer or a program called File Explorer. You can restart File Explorer by closing it in Task Manager and then opening it again using the “Run new task” command and typing “explorer.exe” without the quote.
Check: Inspiration Quotes
Also read: Windows 12: What to Expect from Microsoft’s Latest Operating System
Try the Xbox Game Bar!

If you like to play games on your computer, don’t ignore the Xbox Game Bar just because you don’t have an Xbox. It’s a useful feature that has been missing from gaming for a long time. It’s like a toolbar that appears on your screen when you press Windows + G. One of the most helpful things it does is show you how your computer is performing while you’re playing. It tells you things like how much memory your computer is using and how many frames per second you’re getting. You used to have to use a program called MSI Afterburner to do this, but that was a hassle for many people. The Xbox Game Bar is much easier to use, and you can move it around on your screen to make it more convenient.
Using More Than One Desktop
Windows 11 has brought back the feature of using multiple desktops, which was also available in Windows 10. To use it, you just need to turn on the Task View icon in your taskbar through Settings. Then, you can add a new desktop and switch between them by clicking the icon and selecting the one you want to use.

This feature is useful because you can have different apps open on different desktops and switch between them quickly. For example, you can have work apps open on one desktop and personal apps on another. In Windows 11, you can also set a different wallpaper for each desktop, which helps you recognize which desktop you are using. However, the same theme will be applied to all desktops.
Check: M.E Student Result
Also read: Microsoft Edge and OpenAI team up to bring new features to users
Adjust Your Privacy Settings in Windows 11
In Windows 11, Microsoft tracks our activities to personalize suggestions, ads, and the overall experience. However, we can disable these settings if we don’t want to be tracked. To do this, go to Settings > Privacy & Security > General and turn off the settings that allow Microsoft to serve you ads.

After disabling the ad settings, go to the Privacy & Security section in Settings and select Diagnostics & Feedback. Microsoft says it needs to collect data on you to keep your PC secure and updated. However, you can uncheck the box at the bottom if you don’t want Microsoft to use your diagnostic data to personalize tips, ads, and recommendations. You cannot completely opt out of this data collection, but you can turn this off to protect your privacy.
Use Live Captions in Windows 11
Windows 11 now has a feature called Live Captions that can add captions to videos. It’s a cool feature, but sometimes the captions are not always correct. By default, the captions show up at the top of the screen, but you can move them to another spot on the screen. The feature can work with a variety of video players, including Microsoft’s media player, Edge browser, Google Chrome, and VLC.

Live Captions is a feature in Windows 11 that provides text captions for videos. It can be useful for people with hearing difficulties, as well as in games that do not offer subtitles. The captions can be displayed as a bar on the top of the screen or a floating box. It works with various media players and web browsers, including Google Chrome and VLC. However, there are some limitations in games, such as it only works in windowed mode and has a slight delay. It also only supports English and may not work well with music videos where people are screaming or growling.
Check: Attitude Images
Also read: Google Bard: Exciting New Features and Improvements
Try using Focus Mode
You don’t have to be a writer on a tight schedule to enjoy the new Focus mode in Windows 11. It’s a useful feature that can help you concentrate and get your work done without being interrupted by notifications. To start a Focus session, go to Settings, then System, and click Start Focus Session.

When the Focus mode is on, your PC won’t be disturbed by notifications for the set time. Notifications in the taskbar won’t flash, and badge notifications will be turned off.
When you start Focus mode on Windows 11, you will see a timer on the screen that shows how much time you have left. If you need a break, it will notify you after every 20 minutes. You can also listen to music on Spotify while working and add tasks to Microsoft To Do.
How to move the Start button to the left corner
This list includes some features to try when you first use Windows 11. There are other things you might want to do, but these next three changes are optional. We suggest doing them as soon as you start using Windows 11.

The first change is moving the Start button back to the left corner. It’s in the middle by default, but you can go to Settings -> Personalization -> Taskbar and change its location under Taskbar Behaviors.
Try Dark Mode on Windows 11

Some people prefer to use Dark mode because Light mode is too bright for them. If you’re one of them, you can try out this feature in Windows 11. To do so, go to Settings, click on Personalization, and then click on Colors. From there, you can choose Dark mode under “Choose Your Mode” and customize it as you prefer.
Increase your computer’s performance

In Windows 11, power settings are spread out in three different places, which can be confusing. The primary location for power settings is in the Settings app under System -> Power, but the most important settings are still in Control Panel. To access them, go to Control Panel -> Power Options, and click on “Change Plan Settings” and then “Change Advanced Power Settings.” This opens up a window that allows you to customize your power settings in detail, whether you want maximum performance on a desktop or want your laptop to save battery power.
Check: MBA Student Syllabus
Also read: Experience the New Features of macOS Ventura

Hybrid Vehicles: Types, Benefits, and Future

18 Electric Vehicle Brands: Driving the Future of Sustainable Transportation
